


MDF Wall panel Installation Guide

Easy installation of raw or primer panels
Raw or primer panels may be screwed directly to the wall (studs), ensuring there is adequate support. The screw holes can then be puttied, sanded and the panels painted. We recommend an mdf primer by 2 coats of acrylic paint. To achieve the best finish, sand the panels between each coat of paint and follow the paint manufacturer’s instructions. Before fixing, ensure that each panel is the right way up and check that the pattern will align when they are mounted to the wall.
Concealed fixing of finished panels
Using aluminium Z brackets to fix finished panels to the walls is a great option as they are:
• Low profile with a gap of approximately 5mm between wall and wall panels
• Lightweight and strong
• Easily removable

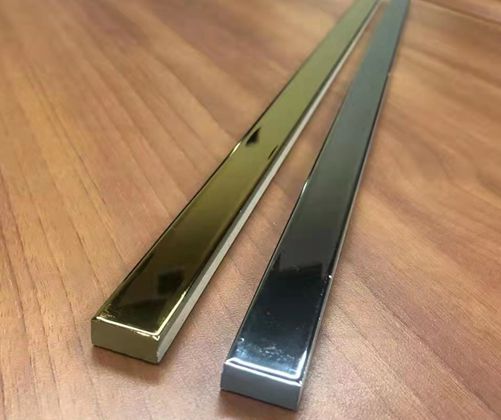
Z brackets are available from Pangu. The dimensions of the Z brackets are 5mm thick x 46mm wide x 2000mm long.
The wall panels are butt joined. Alternatively they may be biscuit joined or mounted with a negative detail i.e. with a space between the panels. A suggested method of fixing butt joined wall panels to a wall follows.
Note: As the panels are of differing thickness over the patterned surface, always use screws that are of the appropriate length so that when screwing Z brackets to the panels from the rear, the
screws won’t go through the patterned surface.
Z brackets for each wall panel can be cut to 6 x 200mm pieces. These are then fixed to the back of the wall panels at the left and right hand sides at the top, middle and bottom with appropriate length screws and adhesive.
Using screws of the appropriate length, (wall screws will be much longer than panel screws) screw full lengths ofZ brackets to the walls so that the entire wall has full lengths running across it at the top, middle and bottom. The position of the Z brackets on the wall are to be offset by the width of the Z brackets on the panels.
Allow at least a 20mm gap from the ceiling to the top of the panel to allow the panel mounted bracket to be slid over the top of and into the wall mounted bracket. The panel will be locked into place when the panel mounted bracket is slid all the way
into the wall mounted bracket.

For vertical edge panel alignment (optional):
To align the panel edges snugly against each other, the following is suggested:
A 2000mm Z bracket is cut into 2 * 1000mm lengths for each panel. If starting to mount the panels from the left hand side of the wall, fit the 1000mm lengths above and below the horizontally mounted Z brackets on the right hand edge of the first panel so that the edge protrudes past the edge of the panel about 7mm. Then on each subsequent joining panel except the last one, affix the Z brackets in the same way.
Flat bar dimensions are 3mm thick x 31mm wide x 2000mm long available from 3D Wall Panels. Cut the flat bar into
2 x 1000mm lengths.
These are fitted to the second panel, at the left hand edge above and below the horizontally mounted Z brackets with the edge protruding about 10mm. Repeat this procedure for each subsequent joining panel. The panels can then slide into the wall mounted brackets, whilst also ensuring that the flat bar slides into the horizontally panel mounted Z brackets as shown in figure 2 and figure 3.
Total length of Z bracket recommended for concealed installation per panel: 4.8m or if using the Z bracket/flat bar combination 6.8m and 2m of flat bar. A suggested adhesive for use in combination with screws is Sikaflex or Simpson ISR 70-05 by Bostik.

Installation of internal and external corners
External corners may be created by cutting and mitering the panels, however it must be noted that approximately 3mm of the design is lost in the cutting process. Therefore the pattern may not necessarily align when the edges are put together. For easier treatment of external corners, an aluminium square or angle can be fitted on the corner. An added advantage is the protection of the panel edges. Similarly for internal corners, an aluminium square can be used so that the panels are butted up against it on either side. If internal corner mitering is preferred, it must be noted that approximately 40mm of the pattern will be lost in the cutting process, so if pattern alignment is preferred, then panels should be cut from full sized panels starting from the corner and mounting outwards.
Any exposed edges of panels may be fitted to an aluminium angle to minimise the possibility of them being damaged.
Exterior panels
Waterproof outdoor polymer panels are supplied raw only. They should be fitted to a frame or wall and painted after
installation as the panels are slightly flexible. Polymer panels may have random air bubbles below the surface which are revealed after sculpting of the face. These small holes can be puttied with plumbers bog, sanded and painted over. It is recommended the panels be painted in a light colour as dark colours will expand due to heat absorption. Unless securely fixed to a structure or frame, the panels should be painted on both sides to prevent bowing. All designs except Dunes, Reflections and Arcs are available in polymer material.
Installation Notes
This information is intended as a guide only. Each situation will differ and there may be alternative methods of installation not described here.
For a professional installation, contact your local shopfitter or other suitably qualified person. Alternatively we may be able to provide you with the contact details of people who have previously installed Pangu Panels.
For pattern alignment, ensure that the panels are mounted straight and level on a flat and even surface. It may be necessary to install the panels off the floor or kickboard and ceiling as they may not be straight. Check that the wall is level. If not it may be necessary to use a frame or packers.
The pattern on the panels will align on uncut edges only.
Categories
latest blog
 #29 B7 China ceramics trading center Nanzhang town Foshan Guangdong China
 13929916799


Add me

follow company
Add our wechat we can talk now ! Follow our company you can get more update info. & news and catalogs !
© Copyright: DOZAN MOSAIC & TILES LTD. All Rights Reserved.

IPv6 network supported